


Good morning dear friends
as promised, i am happy to present my video tutorial for this beautiful project i created yesterday.
Once again, i need to outline that i took inspiration from a German Website who creates industrial Soap packaging only. A certain Ann Melvin has approached me with abusive comments here on my blog as well as my video channel repeatedly now , claiming i copied several of her makes.
I do not look at Ann Melvin´s blogs, websites or video channels because her work is of no interest for me whatsoever.
However, due to the character of her approach, i have now got a solicitor dealing with this issue.
My inspiration for this project came indeed from Garten Eder and it is indeed my very own creation, inspired by a soap packaging from Garten Eder in Germany.
I think it is very unprofessional to drop harassing comments on somebody else´s blog or video channel like Ann Melvin and some of her friends did, instead of sending a letter or an Email to try and clarify the situation like a professional would do.
I would have happily let her know the source of my inspiration , however, she choose to make herself look unprofessional and a bully in first place.
Never mind, some people have an Ego so big they obviously believe the world turns around them only.
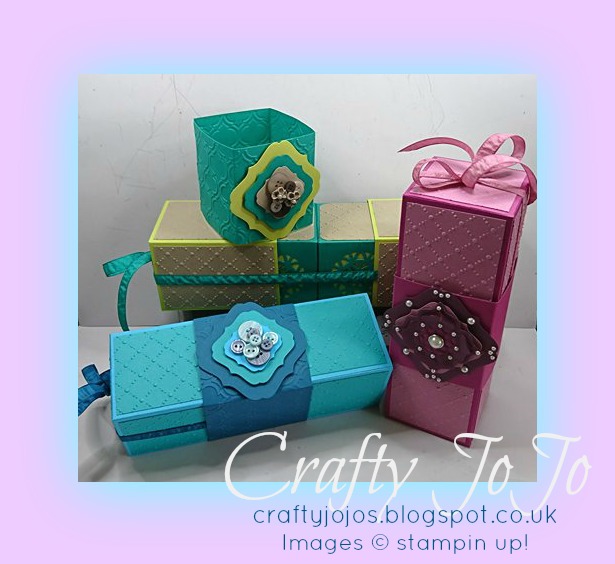
Back to my project -
Here are the measurements i used to set the boxes up:
For the 3 cube boxes:
3 pieces 11" x 9 1/2"
score at 1",3 1/2", 6" and 8 1/2" on both sides of the card stock.
You would then need to put 4 additional score lines in on the short side of your card stock, scoring the flaps to glue the box together at 2 1/2" and 6 3/4"as seen in the video tutorial.
For the 2 slider boxes:
2 pieces 7 5/8" x 11 1/4"
score at 3/4", 3 3/8", 6" and 8 5/8" on the long side
score at 3 7/8" and 6 1/2" on the short side.
You would then need to put in 2 additional scorelines at 2 1/2" and at 7" as seen and explained in the video tutorial.
For thedecorcative panels that get embossed, you will need to cut
8 x 3 5/8" x 2 3/8" and
2 x 2 3/8" x 2 3/8" for the slider boxes and
11 x 2 3/8" x 2 3/8" for the 3 cube boxes.
The belly band measures 11 1/4" x 3 " and you need to score at 1 1/4", 3 7/8", 6 1/2" and 9 1/4".
These scorelines may vary depending on the thickness of your you card stock used and the embossing you did or did not. Please check carefully your finished box by measuring the width of each segment before scoring your belly band.

The video tutorial, that explains in detail how to score and put this project
together is ready for you here:
I hope you have good fun making these and thanks for dropping by today.
Happy crafting and bye for now
JoJo xx
Happy crafting and bye for now
JoJo xx
Product List


 Ruched Ribbon")
Sweet Sugarplum 3/8" (1 Cm) Ruched Ribbon
£7.25

Curvy Corner Trio Punch
£18.00

